How to use time-lapse photography with a GoPro camera for service "Mapillary"
Over the past six months increased the popularity of the web service "Mapillary": downloaded over half a million photographs and more than 100 thousand pieces — only for the last 10 days!
/ > At first glance it seems that this case is suitable only an ordinary smartphone. What if to collect photos for "Mapillary" you can use action camera such as the GoPro? Installed on the bike, helmet or even a car? As it turned out, it is possible.
And so last week I took a little drive and collected about 1700 photos half hour using TimeLapse function. On my 32 GB SD-card ate it just 3.4 GB. I could still ride more than 4 hours and took about 150 thousand of photos before my memory card filled up fully!
However, the case is not quite trivial, so I guess you need to explain more how it's done. The main problem is that the GoPro does not contain a GPS receiver. How the map service will know where on the map to display photos? We must give him this information, so you'll have to use a separate GPS receiver. Personally, I used my HTC One smartphone is the same as I used before to make ordinary photos to "Mapillary".
Briefly, the procedure is as follows:
the
Like, it doesn't look too difficult. Let's describe these steps in more detail by the example of my trip last week.
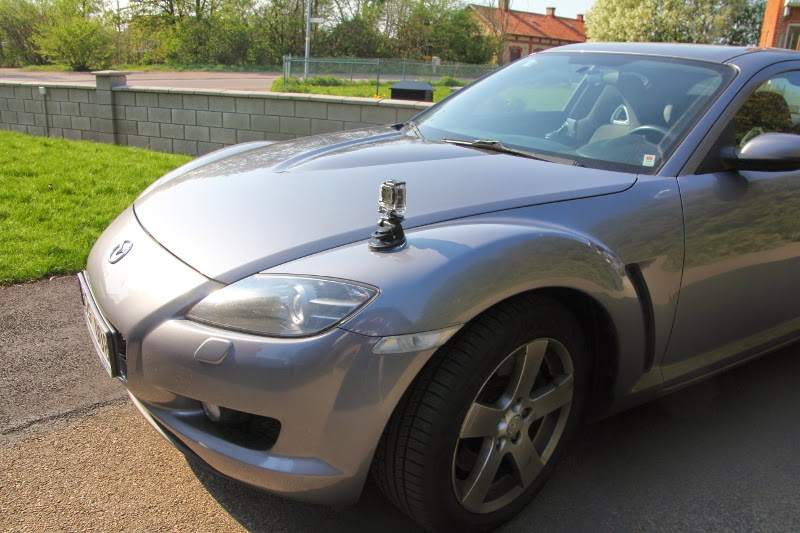
I attached a GoPro on the front left fender of my Mazda RX8 to get a good view of the middle of the road.
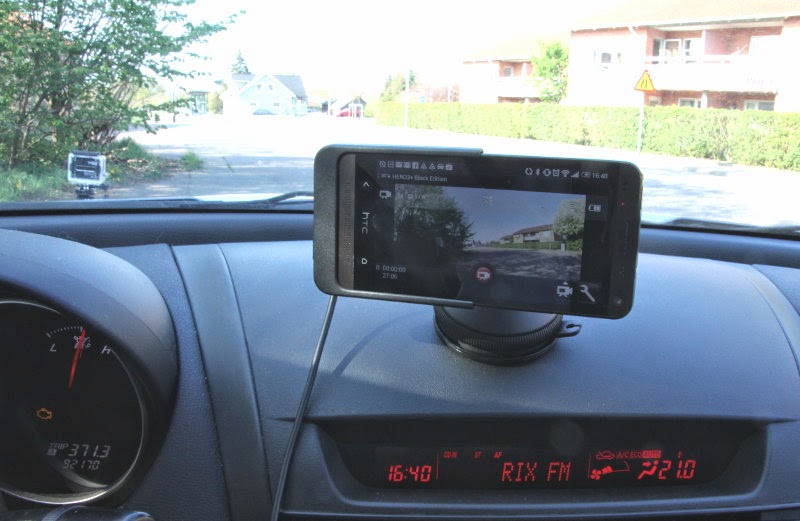
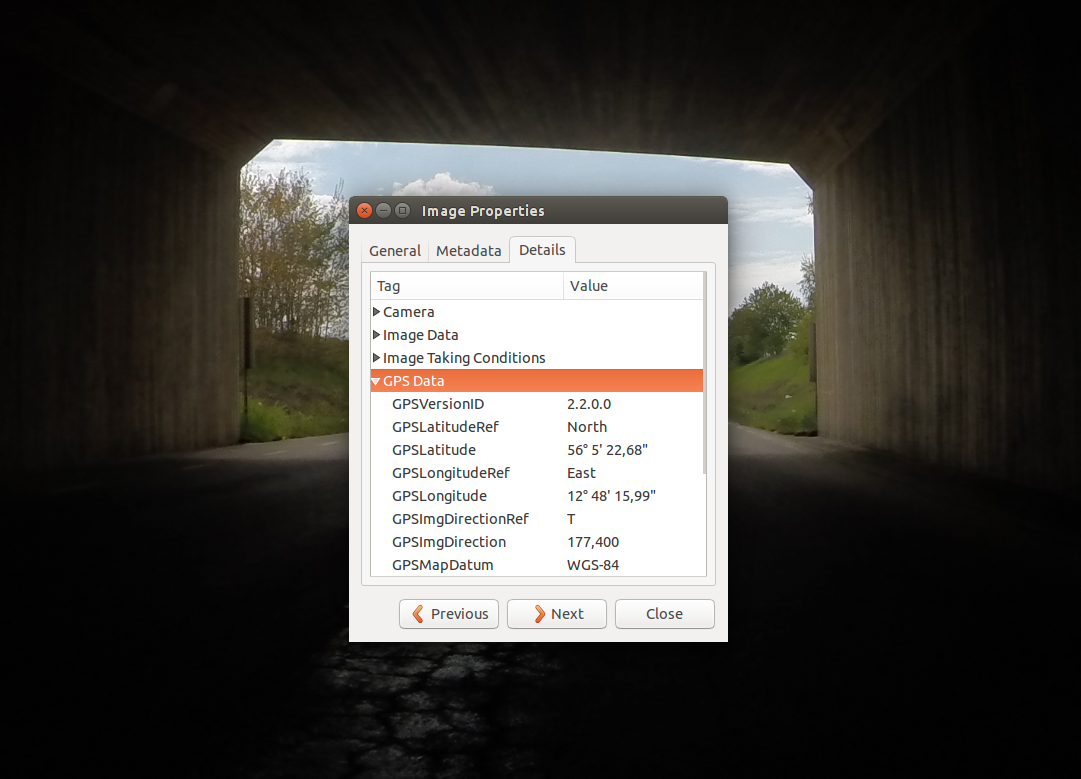
Then I strengthened my HTC One in the car for special fasteners. Using the program "GoPro App," I joined the chamber and brought into the preview of the image area how it sees the GoPro. It's convenient but, in fact, not very necessary, because with the beginning of the recording, the preview will disappear. It is only necessary that the mobile was in the car in the place where it swallows the signal of the GPS satellites. If you use the application "GoPro App", take some time to adjust the time on the camera: the difference of the current time on the device should be as small as possible. As you will see later, you will have to take into account the time difference, to synchronize tracks and photos. And the less correction will have to make, the easier it will be to do the job.
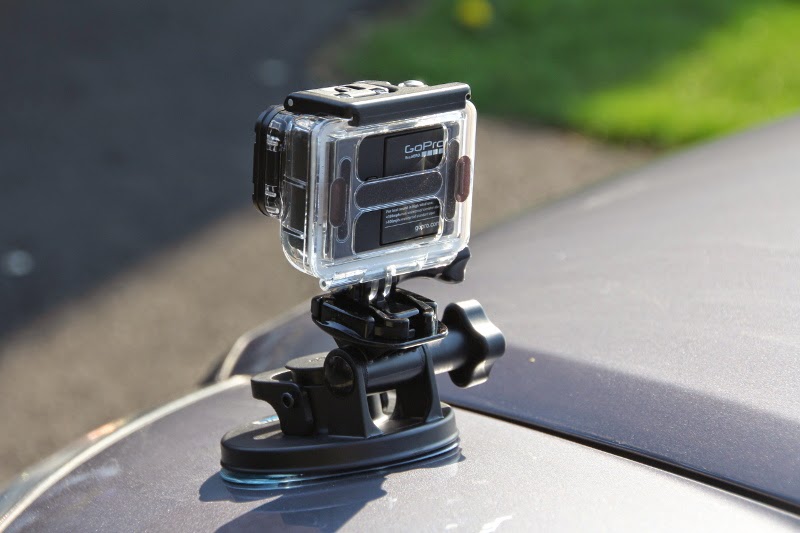
Will check camera settings again: there should be included time-lapse mode "time-lapse photos". It is easy to do with the app, GoPro App, but you can on the GoPro. I chose 5MB Medium narrow field of view (Narrow) to get a view similar to the one that I removed from the phone. Equivalent focal length (converted to 35 mm camera) will be approximately 20 mm. GoPro Settings by default provide a wide field of view with large optical distortion, so in this trip I refused to use this mode. I'm planning another article to describe another scenario, when I was doing photos for Mapillary of the wide-angle 4K video stream. It was harder, so just skip the story.
If you selected setting 1 frame per second, the distance between the photos will be 10-20 meters at a speed of 40-80 km/h. recommendation Mapillary about one frame every two seconds is more suited for the bike, and I plan of course to move faster than a Bicycle!
Start the app to record your GPS track. In this case, I used the program geopaparazzi. In this app there is a button to start recording. I pressed the button and confirmed the suggested file name to save the track. OK. Now everything is ready. It remains only to start shooting, and go!
Roll, stop recording on the camera and the GPS receiver. So now the real work begins! We need to perform a geolocation before we can upload our stuff to Mapillary. In Geopaparazzi I exported to GPX track file, and himself sent him in the mail. From GoPro I simply pulled the card and copied her photos on the laptop.
The first thing I wanted to do is see how looked my trip. I executed the command:
the
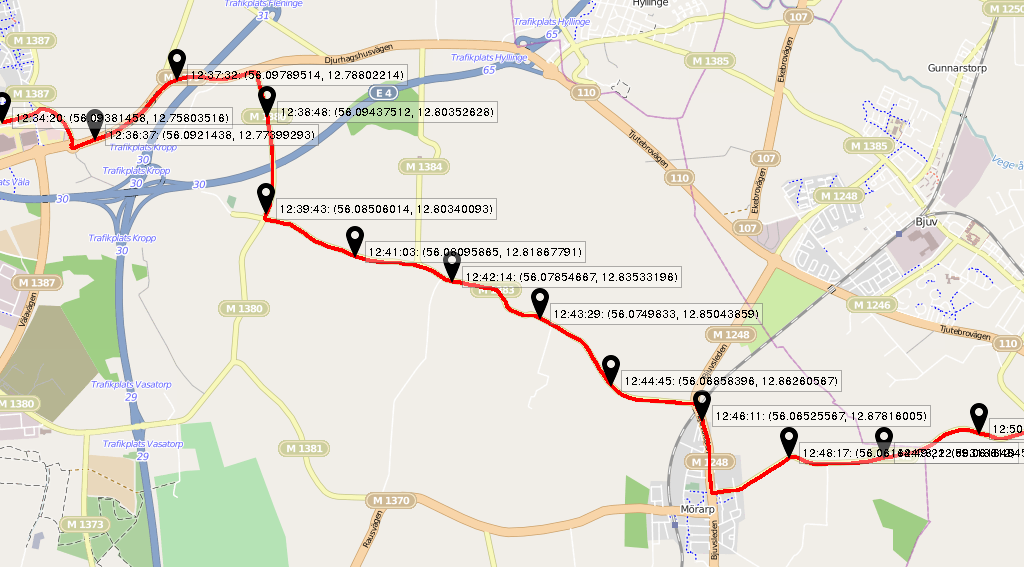
The result is a good picture in high resolution of the entire card path. notice the use of the-D option to specify more space between the markers on the map. This is necessary because the geotag default is configured to short tracks, such as, for example, a quick bike ride. On the resulting image shows the time and the location of key points of the trip. Need to enlarge the scale in a few specific places where we can manually check the timing on the camera and GPS receiver to precisely determine the clock between them. In the synchronization phase, we can adjust this difference, and it is important to identify it correctly.
I executed the command:
the
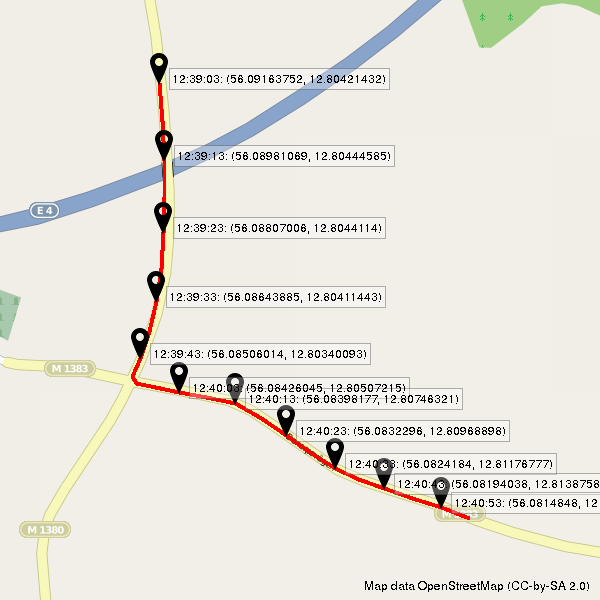
I can find a photograph where I go under the bridge, and check the clock.

EXIF data of this photograph indicate that it was made at 12:39:11. Looking at the map, see where we went under the tunnel at 12:39:14. Thus, the error is 3 seconds. You can use this value in the geo-referencing process, but better to check with another photo.
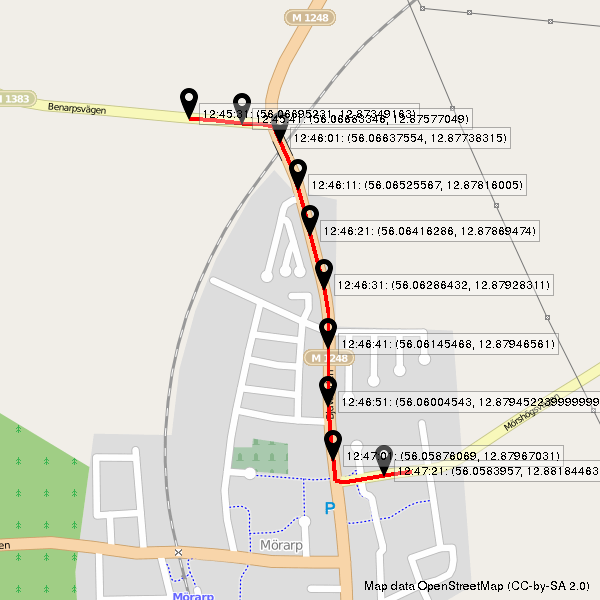
I generated a map of the way through Marac because I will be able to identify objects such as buildings and intersections. You should not use the crossroads where you stayed (as, for example, my right turn). Look for these landmarks close to where you were in motion. I was looking for the first passage on the right top of the map, and found the picture taken at 12:46:10.

I took note of a few landmarks, about which I know exactly where they are: a warning sign in the middle, white markings at the intersection, a street light pole.
Another interesting way of checking is also available — if you were in a place where there are pictures of Google street view, you can compare two images.

The images from Google street view shows a road sign, marking the intersection, a tree and a post light. But note that there is no fence, instead grow trees. It is clear that construction has begun after in this place drove a car Google. Google says that the picture was taken in September 2011 — about 2.5 years ago — of course, something has changed.
From the data of the GPX track using Merab shows that the crossroads were at 12:46:13, which is 3 seconds later than the camera captured in the photograph. And again we have error in 3 seconds. This is good: it turns out that throughout the track error is the same. You can continue to sync all 1500 photos using the command:
the
I asked the time shift with the option "-t -3" and used the option "-v", to watch the process. Since the script is a wrapper over a command-line program "exif_file", several processes will start the processing of each file; it takes some time, but in the end, all your photos will contain information for reference taken from GPX.
When the bind geo-information to photos has completed, you can upload photos on mapillary.com. Log on to the website, click on your name, select "Upload images", click "Choose files". Selecting all files, scroll down the page and click "Start Uploading". Colors on the website is that it is not always clear whether to start the download. Just scroll up and you will see red indicators download under each image.
Finally, when the download is complete, click on your name, select "my uploads"' and you will see the new image for your track.
Click on your latest the download, to browse photos in Mapillary!

Full photo editing can take some time, so don't be alarmed if they will not be available immediately. Go back to them later.
The settings in the GoPro for the described method of photographing is not for nothing called "Time Lapse" — "slow motion". From the pictures, you can make a video. Since we were shooting one frame per second — if we do a video frequency of 25 frames per second, we get a 25-fold acceleration. That's great! Look what I got:
This video was done this way:
the
This article was widely used command geotag. This command is included in the ruby gem "gpx2exif". This article used the possibilities available in version 0.3.6. However, at the time of publication of this article was available in version 0.3.1. So I will explain how to install the fresh version.
The first thing you need is Ruby. Installation depends on your operating system. I'm using Ubuntu 14.04 and RVM, here I'll give instructions that are appropriate to my OS. And to you I recommend to go to sites ruby-lang.org and rvm.io for advice that is appropriate for your platform.
the
Part of the program that creates the image in PNG format, uses ImageMagick. In relation to Ubuntu that means you need to first install a few dependencies:
the
When ruby installed, just install the gem:
the
Then print the list with the command "gem list" to see what version was installed as a result. If she's older than 0.3.5, then follow the instructions below.
the
If all goes well, then you have collected and installed the most recent version of a Ruby Gem.
Article based on information from habrahabr.ru
/ > At first glance it seems that this case is suitable only an ordinary smartphone. What if to collect photos for "Mapillary" you can use action camera such as the GoPro? Installed on the bike, helmet or even a car? As it turned out, it is possible.
And so last week I took a little drive and collected about 1700 photos half hour using TimeLapse function. On my 32 GB SD-card ate it just 3.4 GB. I could still ride more than 4 hours and took about 150 thousand of photos before my memory card filled up fully!
However, the case is not quite trivial, so I guess you need to explain more how it's done. The main problem is that the GoPro does not contain a GPS receiver. How the map service will know where on the map to display photos? We must give him this information, so you'll have to use a separate GPS receiver. Personally, I used my HTC One smartphone is the same as I used before to make ordinary photos to "Mapillary".
Briefly, the procedure is as follows:
the
-
the
- to Strengthen the camera on the bike or car with a variety of mounting accessories. the
- to Start the program to record the GPS track. I used the program geopaparazzi, but there are many others that work just as well. the
- to Set the GoPro on time-lapse photography. I chose the settings: 5MP, medium, narrow, 1s. the
- Start and ride GoPro. the
- to Upload the photos and GPX track to the computer. the
- Program gpx2exif snap photos to geographic coordinates, synchronizing the shooting time with the GPX track. the
- to Upload photos to Mapillary.
Like, it doesn't look too difficult. Let's describe these steps in more detail by the example of my trip last week.
I attached a GoPro on the front left fender of my Mazda RX8 to get a good view of the middle of the road.
Then I strengthened my HTC One in the car for special fasteners. Using the program "GoPro App," I joined the chamber and brought into the preview of the image area how it sees the GoPro. It's convenient but, in fact, not very necessary, because with the beginning of the recording, the preview will disappear. It is only necessary that the mobile was in the car in the place where it swallows the signal of the GPS satellites. If you use the application "GoPro App", take some time to adjust the time on the camera: the difference of the current time on the device should be as small as possible. As you will see later, you will have to take into account the time difference, to synchronize tracks and photos. And the less correction will have to make, the easier it will be to do the job.
Will check camera settings again: there should be included time-lapse mode "time-lapse photos". It is easy to do with the app, GoPro App, but you can on the GoPro. I chose 5MB Medium narrow field of view (Narrow) to get a view similar to the one that I removed from the phone. Equivalent focal length (converted to 35 mm camera) will be approximately 20 mm. GoPro Settings by default provide a wide field of view with large optical distortion, so in this trip I refused to use this mode. I'm planning another article to describe another scenario, when I was doing photos for Mapillary of the wide-angle 4K video stream. It was harder, so just skip the story.
If you selected setting 1 frame per second, the distance between the photos will be 10-20 meters at a speed of 40-80 km/h. recommendation Mapillary about one frame every two seconds is more suited for the bike, and I plan of course to move faster than a Bicycle!
Start the app to record your GPS track. In this case, I used the program geopaparazzi. In this app there is a button to start recording. I pressed the button and confirmed the suggested file name to save the track. OK. Now everything is ready. It remains only to start shooting, and go!
Roll, stop recording on the camera and the GPS receiver. So now the real work begins! We need to perform a geolocation before we can upload our stuff to Mapillary. In Geopaparazzi I exported to GPX track file, and himself sent him in the mail. From GoPro I simply pulled the card and copied her photos on the laptop.
The first thing I wanted to do is see how looked my trip. I executed the command:
the
geotag -g väla_to_billesholm.gpx \
-o väla_to_billesholm.png \
-D 1-s 2048x2048
The result is a good picture in high resolution of the entire card path. notice the use of the-D option to specify more space between the markers on the map. This is necessary because the geotag default is configured to short tracks, such as, for example, a quick bike ride. On the resulting image shows the time and the location of key points of the trip. Need to enlarge the scale in a few specific places where we can manually check the timing on the camera and GPS receiver to precisely determine the clock between them. In the synchronization phase, we can adjust this difference, and it is important to identify it correctly.
I executed the command:
the
geotag -R 20140505T12:39:00+02-20140505T12:41:00+02 \
-g väla_to_billesholm.gpx \
-o krop.png -D 0.1
I can find a photograph where I go under the bridge, and check the clock.
EXIF data of this photograph indicate that it was made at 12:39:11. Looking at the map, see where we went under the tunnel at 12:39:14. Thus, the error is 3 seconds. You can use this value in the geo-referencing process, but better to check with another photo.
I generated a map of the way through Marac because I will be able to identify objects such as buildings and intersections. You should not use the crossroads where you stayed (as, for example, my right turn). Look for these landmarks close to where you were in motion. I was looking for the first passage on the right top of the map, and found the picture taken at 12:46:10.
I took note of a few landmarks, about which I know exactly where they are: a warning sign in the middle, white markings at the intersection, a street light pole.
Another interesting way of checking is also available — if you were in a place where there are pictures of Google street view, you can compare two images.
The images from Google street view shows a road sign, marking the intersection, a tree and a post light. But note that there is no fence, instead grow trees. It is clear that construction has begun after in this place drove a car Google. Google says that the picture was taken in September 2011 — about 2.5 years ago — of course, something has changed.
From the data of the GPX track using Merab shows that the crossroads were at 12:46:13, which is 3 seconds later than the camera captured in the photograph. And again we have error in 3 seconds. This is good: it turns out that throughout the track error is the same. You can continue to sync all 1500 photos using the command:
the
geotag -g väla_to_billesholm.gpx \
I asked the time shift with the option "-t -3" and used the option "-v", to watch the process. Since the script is a wrapper over a command-line program "exif_file", several processes will start the processing of each file; it takes some time, but in the end, all your photos will contain information for reference taken from GPX.
When the bind geo-information to photos has completed, you can upload photos on mapillary.com. Log on to the website, click on your name, select "Upload images", click "Choose files". Selecting all files, scroll down the page and click "Start Uploading". Colors on the website is that it is not always clear whether to start the download. Just scroll up and you will see red indicators download under each image.
Finally, when the download is complete, click on your name, select "my uploads"' and you will see the new image for your track.
Click on your latest the download, to browse photos in Mapillary!
Full photo editing can take some time, so don't be alarmed if they will not be available immediately. Go back to them later.
And now slow motion video capture
The settings in the GoPro for the described method of photographing is not for nothing called "Time Lapse" — "slow motion". From the pictures, you can make a video. Since we were shooting one frame per second — if we do a video frequency of 25 frames per second, we get a 25-fold acceleration. That's great! Look what I got:
This video was done this way:
the
-
the
- Rename all the photos so that the file names have numbers, starting with 0000. I asked the names of such foo-0000.jpeg. To make your life easier, I wrote a ruby script that creates hard links to the necessary names. You can then use ffmpeg to assemble the video:
theffmpeg -f image2 -i foo-%04d.jpeg \ -r 25 -s 1280x960 ../myvid.mp4
- Then I use the OpenShot video editor has fulfilled the cropping to 16:9, added sound, added the map and clamped to 720p medium quality for faster uploading to the web.
This command compresses 7-megapixel photos at 4:3 format in the video with 960p HD clarity. the
Setting gpx2exif
This article was widely used command geotag. This command is included in the ruby gem "gpx2exif". This article used the possibilities available in version 0.3.6. However, at the time of publication of this article was available in version 0.3.1. So I will explain how to install the fresh version.
Installing Ruby on Ubuntu
The first thing you need is Ruby. Installation depends on your operating system. I'm using Ubuntu 14.04 and RVM, here I'll give instructions that are appropriate to my OS. And to you I recommend to go to sites ruby-lang.org and rvm.io for advice that is appropriate for your platform.
the
sudo apt-get install curl
curl -sSL https://get.rvm.io | sudo bash -s stable --ruby
sudo usermod -g rvm craig
# logout and login to get RVM group
source /etc/profile.d/rvm.sh
Part of the program that creates the image in PNG format, uses ImageMagick. In relation to Ubuntu that means you need to first install a few dependencies:
the
sudo apt-get install imagemagick imagemagick-doc libmagickwand-dev
gem install rmagick # Requires libmagickwand-dev to compile
Installation of rubygems.org
When ruby installed, just install the gem:
the
gem install gpx2exifThen print the list with the command "gem list" to see what version was installed as a result. If she's older than 0.3.5, then follow the instructions below.
Install from github
the
git clone https://github.com/craigtaverner/gpx2exif
cd gpx2exif
bundle install
rake build
gem install pkg/gpx2exif-0.3.6.gem
If all goes well, then you have collected and installed the most recent version of a Ruby Gem.
Comments from the translator:
1) What is "Mapillary"? As expressed Zverik: "Mapillary for pictures — as OpenStreetMap for maps." In a nutshell, it's an analogue of Google street view and Yandex. panoramas, working on the principle of crowdsourcing. Users upload their geo-located photos which are then displayed on the map together with the line of the route. The content license allows the use of information obtained from photos in OpenStreetMap.
2) For geo-referencing of photos there is such a script in Python e: https://github.com/mapillary/mapillary_tools/blob/master/python/geotag_from_gpx.py
3) About everything mentioned in paragraphs 1 and 2, I learned from the article "the National panorama" in the user's blog Zverik.
4) the Most convenient way to fix the discrepancy in the testimony of hours to photograph the camera clock to the GPS device.

