Migrating data to Windows Azure SQL Database from PostgreSQL
Hello!
/ > In this article I will show how easy it is to migrate (transfer data) with PostgreSQL on cloud database Windows Azure SQL Database.
Main steps:
To create a new database, open the control panel in Windows Azure (https://manage.windowsazure.com/). Even if you don't have a subscription, you can use the trial period — $200 for one month, that's more than enough for various experiments.
Click + New in the lower left and select Data Services > SQL Database > Quick Create. Fill in the required fields — the name of the database, region data center and login/password to access the database:

After a moment you should see a message that the database creation was successful:

The default is to create a database with a maximum size of 1Gb — after reaching the upper limit, the database switches to read-only. However, if necessary the size can be increased up to 150GB.
Now need to install ODBC driver for postgresql. Download latest version from official website (download the 32-bit version, it is less of a problem). Attention! To install the driver need to the computer, which in the future will be made up data, not the database server.

Installation is elementary and does not cause any problems — Next-Next-Next-Finish.
After this we need to add an ODBC Source for both PostgreSQL and for SQL Database - just enter odbc in the start screen and select from the list ODBC Data Sources (32-bit)

In the window that appears, click Add..., select PostgreSQL Unicode and click Finish

After that enter all required information:

Now one of the things for which this article was written — on this window click the Datasource and be sure to check Use Declare/Fetch.
Without that, everything will work while data are scarce, but will falls with error Out of memory on large volumes — so I was having this error on a table with about 60 entries.
Now, also create a Data Source for the destination server in the cloud — only in the list select SQL Server Native Client, and the connection information can be found in the server's control panel, if you click "View SQL Database connection strings for ADO .Net, ODBC, PHP and JDBC". And, as remind us of this window, we must not forget to allow connections to the database with this IP address — by default, the connection only possible with IP addresses of Windows Azure services (and, if this option is enabled in the server settings)

The configuration process is not difficult, and you will then have approximately such picture:

If migration happened with MySQL, then everything would be easier — there is a great tool SQL Server Migration Assistant (SSMA), which supports, among other things, and MySQL, and allows you to migrate very easily and quickly. But for PostgreSQL there is no such, so you'll have to use SQL Server Data Tool (which, incidentally, is also not difficult). Start SQL Server Data Tool, click New Project and create a project based on the template Integration Service Project
Drag from Toolbox'a Data Flow Task, click on it twice — you will be redirected to the Data Flow tab.
Drag in the working area ODBC Data Source and ODBC Destination and connect them with a blue arrow coming from the ODBC Source:
Double-click the ODBC Source, in the window that appears, click New, then New and select our data source:
Click Ok twice to close those Windows and select the table from which data will be imported:
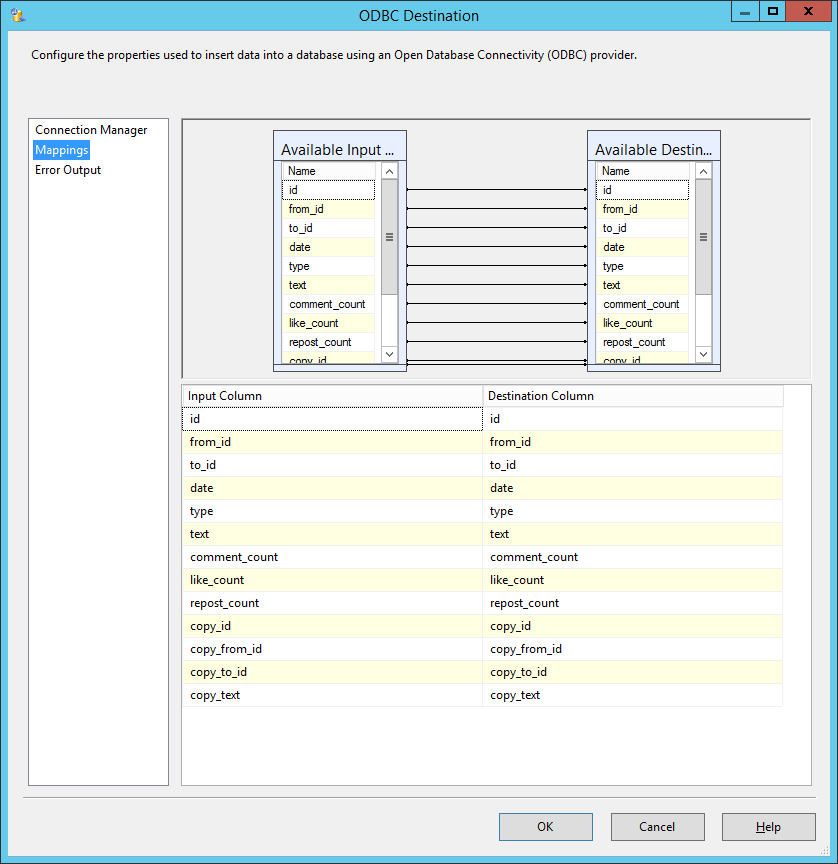
Now we have same way to configure the receiver data — ODBC Destination

There you can adjust the columns if necessary:
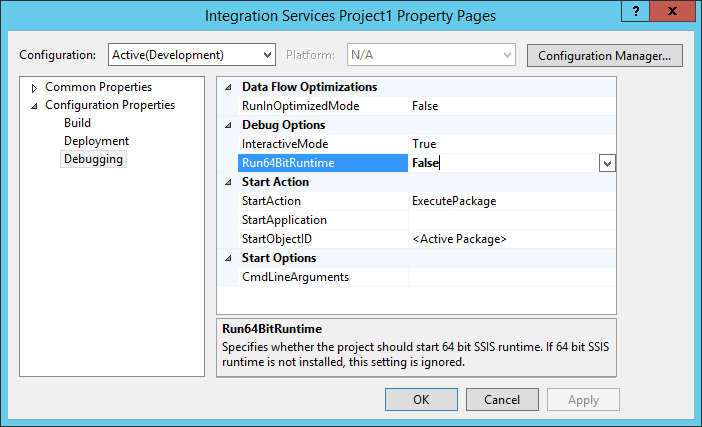
Now another important point — you should switch to run the project in 32-bit mode. Alternatively, right-click the project in Solution Explorer, click Properties, and under Configuration Properties> Debugging install Run64BitRuntime to False.
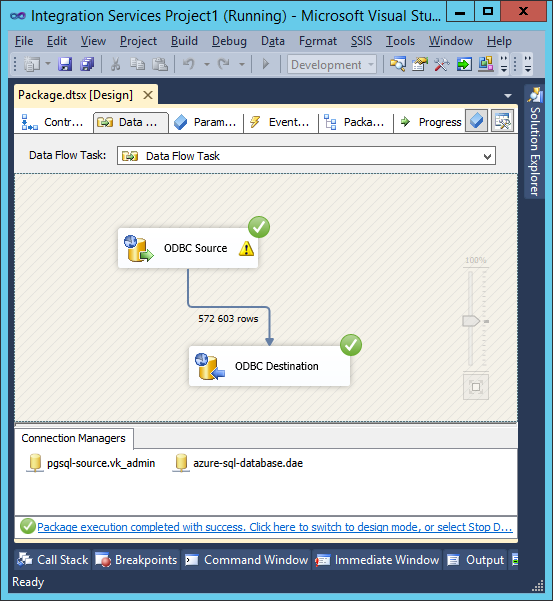
You are now ready to transfer data! Press F5 or click "Start Debugging" in the toolbar. In the work pane displays indicators indicating that a transfer of data:

And in the Progress bar you can see a text report:

Making sure that everything goes according to plan, you can go to drink coffee/tea — it's quite a long process (in my opinion, SSMA worked faster). After the completion of the process on the source and the data receiver have a green checkmark:
And the Progress — text report:

As you can see, 570К lines have been copied for 50 minutes. You can connect to cloud database and make sure that the data is actually there:

So you can easily and quickly transfer large amount of data from PostgreSQL in the cloud database Windows Azure SQL Database.
Article based on information from habrahabr.ru
/ > In this article I will show how easy it is to migrate (transfer data) with PostgreSQL on cloud database Windows Azure SQL Database.
Main steps:
-
the
- create a new database in control panel of Windows Azure the
- Install the ODBC driver for PostgreSQL the
- creating a project in SQL Server Data Tool the
- Importing data
Create new database in control panel of Windows Azure
To create a new database, open the control panel in Windows Azure (https://manage.windowsazure.com/). Even if you don't have a subscription, you can use the trial period — $200 for one month, that's more than enough for various experiments.
Click + New in the lower left and select Data Services > SQL Database > Quick Create. Fill in the required fields — the name of the database, region data center and login/password to access the database:
After a moment you should see a message that the database creation was successful:
The default is to create a database with a maximum size of 1Gb — after reaching the upper limit, the database switches to read-only. However, if necessary the size can be increased up to 150GB.
Installing ODBC driver PostgreSQL
Now need to install ODBC driver for postgresql. Download latest version from official website (download the 32-bit version, it is less of a problem). Attention! To install the driver need to the computer, which in the future will be made up data, not the database server.
Installation is elementary and does not cause any problems — Next-Next-Next-Finish.
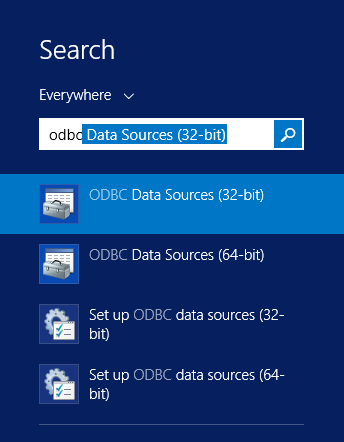
After this we need to add an ODBC Source for both PostgreSQL and for SQL Database - just enter odbc in the start screen and select from the list ODBC Data Sources (32-bit)
In the window that appears, click Add..., select PostgreSQL Unicode and click Finish
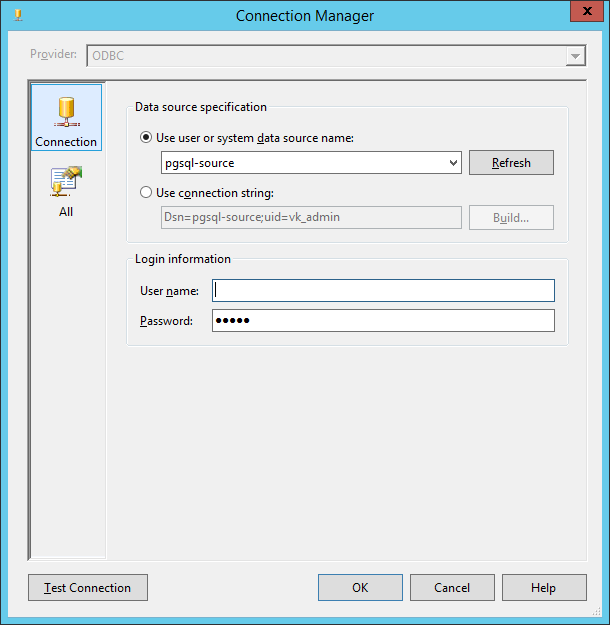
After that enter all required information:
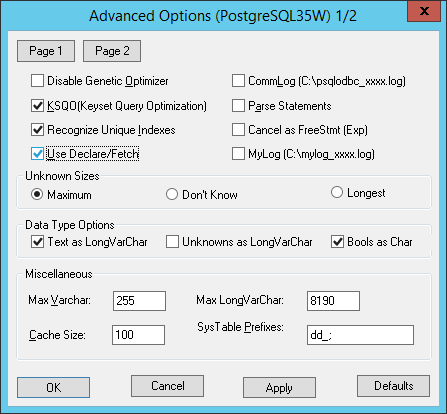
Now one of the things for which this article was written — on this window click the Datasource and be sure to check Use Declare/Fetch.
Without that, everything will work while data are scarce, but will falls with error Out of memory on large volumes — so I was having this error on a table with about 60 entries.
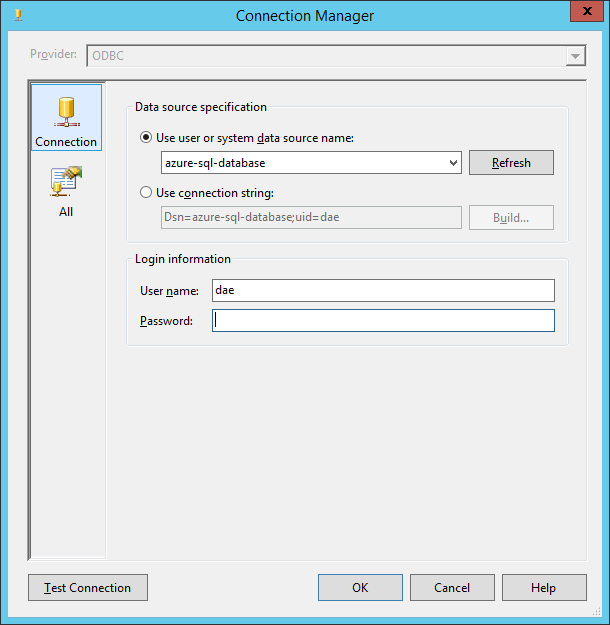
Now, also create a Data Source for the destination server in the cloud — only in the list select SQL Server Native Client, and the connection information can be found in the server's control panel, if you click "View SQL Database connection strings for ADO .Net, ODBC, PHP and JDBC". And, as remind us of this window, we must not forget to allow connections to the database with this IP address — by default, the connection only possible with IP addresses of Windows Azure services (and, if this option is enabled in the server settings)
The configuration process is not difficult, and you will then have approximately such picture:
creating a project in SQL Server Data Tool
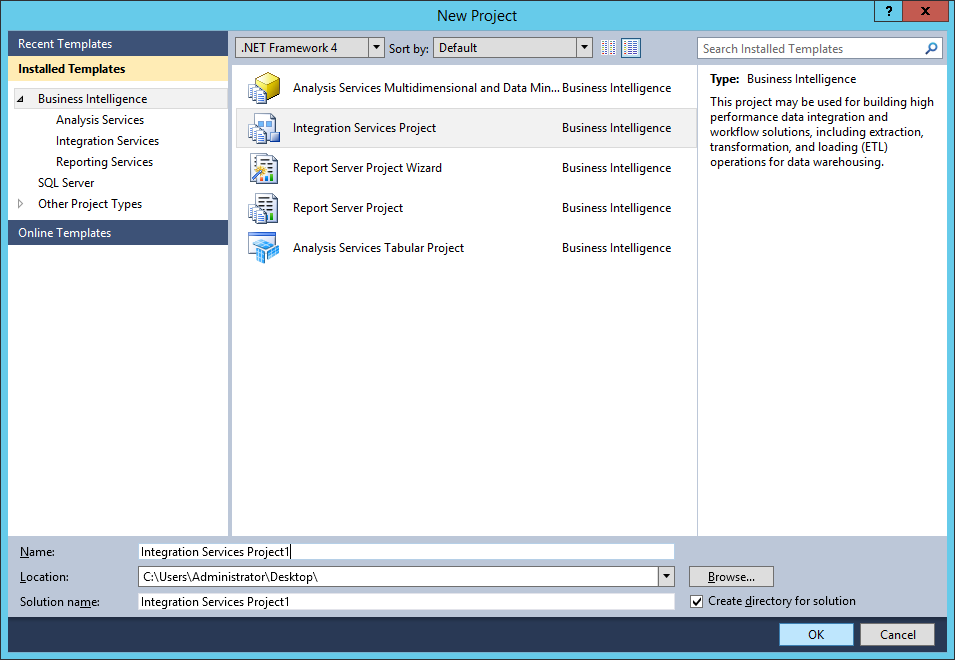
If migration happened with MySQL, then everything would be easier — there is a great tool SQL Server Migration Assistant (SSMA), which supports, among other things, and MySQL, and allows you to migrate very easily and quickly. But for PostgreSQL there is no such, so you'll have to use SQL Server Data Tool (which, incidentally, is also not difficult). Start SQL Server Data Tool, click New Project and create a project based on the template Integration Service Project
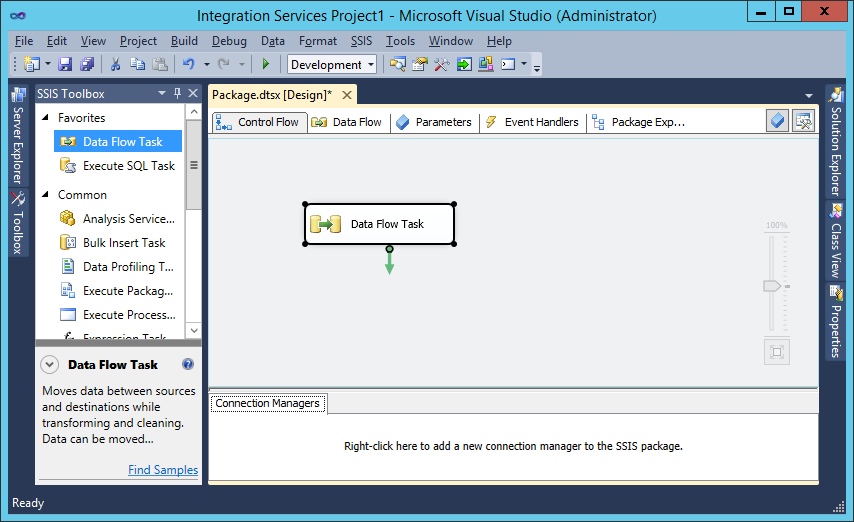
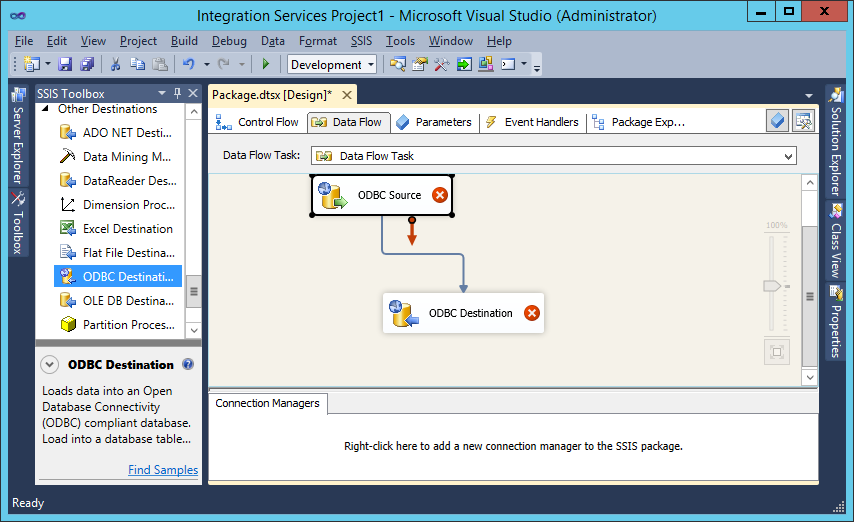
Drag from Toolbox'a Data Flow Task, click on it twice — you will be redirected to the Data Flow tab.
Drag in the working area ODBC Data Source and ODBC Destination and connect them with a blue arrow coming from the ODBC Source:
Double-click the ODBC Source, in the window that appears, click New, then New and select our data source:
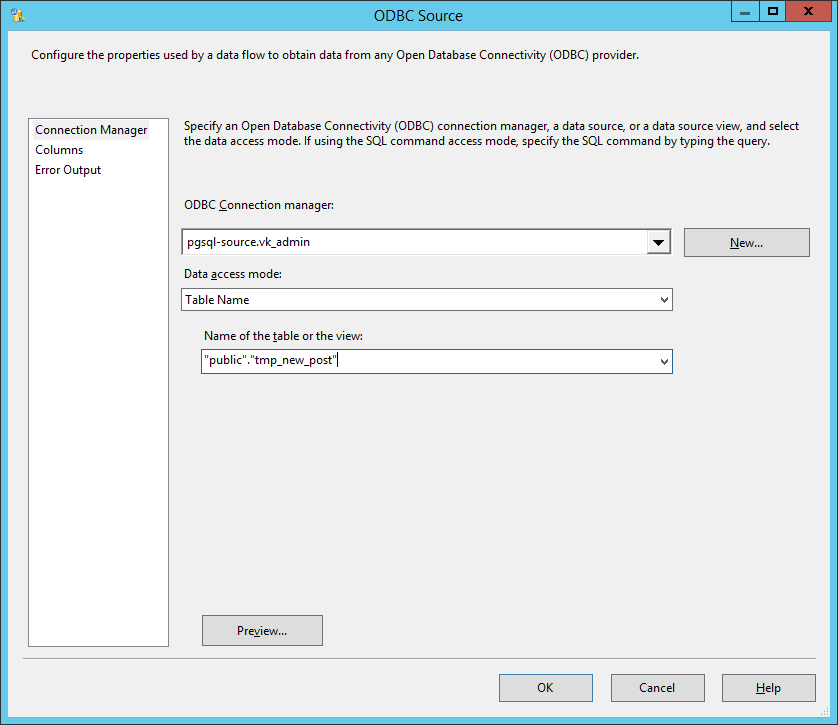
Click Ok twice to close those Windows and select the table from which data will be imported:
Now we have same way to configure the receiver data — ODBC Destination
There you can adjust the columns if necessary:
Now another important point — you should switch to run the project in 32-bit mode. Alternatively, right-click the project in Solution Explorer, click Properties, and under Configuration Properties> Debugging install Run64BitRuntime to False.
data Import
You are now ready to transfer data! Press F5 or click "Start Debugging" in the toolbar. In the work pane displays indicators indicating that a transfer of data:
And in the Progress bar you can see a text report:
Making sure that everything goes according to plan, you can go to drink coffee/tea — it's quite a long process (in my opinion, SSMA worked faster). After the completion of the process on the source and the data receiver have a green checkmark:
And the Progress — text report:
As you can see, 570К lines have been copied for 50 minutes. You can connect to cloud database and make sure that the data is actually there:
So you can easily and quickly transfer large amount of data from PostgreSQL in the cloud database Windows Azure SQL Database.

