Yii2 RESTful API for AngularJS

Hello, dear readers! Judging by your comments to previous articles many of you really wonder how exactly we'll use AngularJS in conjunction with our app for Yii2 framework. In this article, I will raise the curtain and describe the process of connecting the AngularJS framework and how to use it.
I plan to use Yii2 for the bulk of the application, but Angular I use for such application as the modal window of adding ads, search the site, carbuilder (part of the functionality of the site allows you to collect the car of your dreams and send a request to the site administrator and Resellers partners), etc. Anything that would change the current route, but this approach will give our application responsiveness and ease of interaction with the visitor.
In the future we will transfer the project to single page application in AngularJS which will communicate with the backend Yii2 REST. But at the moment, I don't want to do it, because then we will need to handle routing, validation, authorization, access rights and the like as in Angular.js and on the backend.
The structure of RESTful APIs, Yii provides us a clean API that can communicate with a built-in AngularJS app or from our mobile app in the future.
Since we care about performance, we will both feet to go in the direction of REST. Well-structured RESTful application is a big plus, especially if there developed good caching system with a flexible strategy. Also, we plan to place the backend database on a server Amazon EC2 and to provide only JSON data for minimal bandwidth usage. Moreover, Amazon EC2 has such features as auto-scaling, which allows it to automatically adapt computing capacity, depending on site traffic. As for our static content, we will keep it on optimized CDN is Amazon S3, which has the lowest cost and faster speed of response. I'll write more detail in my following articles.
Yii2 framework provides a set of tools to simplify implementation and deployment of RESTful APIs. Now let me show you an example of how to build a set of RESTful
API, with minimal effort on writing code.
To begin, create a controller for the API in the module
Lease, it will be at modules/lease/controllers/frontend ApiController.php and in it write the following:the
<?php
namespace modules\lease\controllers\frontend;

use yii\rest\ActiveController;

class ApiController extends ActiveController
{
public $modelClass = 'modules\lease\models\frontend\Lease';
}
The controller class inherits from yii\rest\ActiveControllerthat implements a common set of RESTful actions. Putting
modelClass, modules\lease\models\frontend\Lease, the controller knows what model can be used to retrieve and manipulate data.In order to provide an opportunity to use our API through ajax requests from other domains, you can add the behavior of
cors in the controller, if necessary:the
...
public function behaviors()
{
$behaviors = parent::behaviors();
$behaviors['corsFilter' ] = [
'class' = > \yii\filters\Cors::className(),
];
// In this place we will add behavior (read below)
return $behaviors;
}
...
Please note that we want to save the configuration behavior of the yii\rest\Controller, that's why we store it in the first line,
$behaviors = parent::behaviors(); and continue to add to it behavior.Yii2 REST API able to give responses in XML and JSON formats. We will only use the JSON format, — inform framework:
the
...

'class' = > \yii\filters\ContentNegotiator::className(),
'formats' => [
'application/json' = > \yii\web\Response::FORMAT_JSON,
],
];
...
We also can easily configure different access rights to action of API controller using the class yii\filtersAccessControl. Indicate that you want to create, edit and delete listings can only authorized users:
the
...
$behaviors['access'] = [
'class' = > \yii\filters\AccessControl::className(),
'only' = > ['create', 'update', 'delete'],
'rules' => [
[
'actions' = > ['create', 'update', 'delete'],
'allow' => true,
'roles' = > ['@'],
],
],
];
...
Also, to ensure control of access to actions, you can override the method
CheckAccess(), in order to check if the current user has the privilege to execute a specific action on a specified data model. For example, let's write a test that a user can only edit or delete their listings:the
...
public function checkAccess($action, $model = null, $params = [])
{
// check whether the user can edit or delete the entry
// throw an exception ForbiddenHttpException if access is denied
if ($action === 'update' || $action === 'delete') {
if ($model- > user_id !== \Yii::$app->user->id)
throw new \yii\web\ForbiddenHttpException(sprintf('You can only %s lease that you\'ve created.', $action));
}
}
...
This method will be called automatically for action class yii\rest\ActiveController. If you create a new controller action that also needs to verify access, you must call this method explicitly in the new action.
The next step we will change the configuration of the
urlManager in bootstrapping the module class in the file modules/lease/Bootstrap.phpthe
...
$app->getUrlManager()->addRules(
[
[
'class' => 'yii\rest\UrlRule',
'controller' => ['leases' => 'lease/api'],
'prefix' => 'api'
]
]
);
...
The above configuration mainly adds a URL rule for the controller API so that data can be accessed and they can be manipulated using short URLS and corresponding HTTP header. We added
prefix to all the links to access the API's services begins with /api/*, so for this pattern, this content can be easily hidden from search engines in the file robots.txt. Further, in each module, which will participate in a RESTful API, this way we will add a controller for the API.Written above a minimal amount of code, we performed the task of creating a RESTful API to access data from the model
Lease. We've created APIs which includes: the
-
the
- GET /api/leases: Get all the listings the
- HEAD /api/leases: Get response header on a GET request /api/leases the
- POST /api/leases: to Create a new listing the
- GET /api/leases/3: Obtain data listing with id=3 the
- HEAD /api/leases/3: Get the response header GET /api/leases/3 the
- PATCH /api/leases/3 and PUT /api/leases/3: Change the data of the listing with id=3 the
- DELETE /api/leases/3: Remove listing id=3 the
- OPTIONS /api/leases: to Obtain a list of available methods request for /api/leases the
- OPTIONS /api/leases/3: Get a list of available methods request for /api/leases/3
Through the mechanism of the framework, Yii2 RESTful API, we implemented API endpoint in the controller action and use these steps for one data type (for one model).
At the moment, we have implemented a part of the backend for the application and can now begin to implement the frontend let's start with the fact that connect AngularJS. We will do this using composer, we just need to add the following lines to the section
“require” in the file composer.json.the
...
"bower-asset/angular": "^1.5",
"bower-asset/angular-animate": "^1.5",
"bower-asset/angular-bootstrap": "^2.2"
...
And execute the command in the command line
php composer.phar update.Now let's make a
AssetBundle in the file so that we can easily hook up with AngularJS files to layout. That it will look like \frontend\assets\AngularAsset.phpthe
<?php
namespace frontend\assets;

use yii\web\AssetBundle;
use yii\web\View;

class AngularAsset extends AssetBundle
{
public $sourcePath = '@bower';
public $js = [
'angular/angular.js',
'angular-animate/angular-animate.min.js',
'angular-bootstrap/ui-bootstrap.min.js',
'angular-bootstrap/ui-bootstrap-tpls.min.js'
];

public $jsOptions = [
'position' = > View::POS_HEAD,
];
}
public $jsOptions = [ ‘position’ = > View::POS_HEAD, ]; tells Yii that it is necessary to enable JavaScript files in the head section of our layout instead place them at the end of the body section, thus, the core of AngularJS will load as quickly as possible. We also need to add this Bundle on the main asset bundle application to connect another ‘js/app.js’, which is an instance of the AngularJS application.the
<?php

namespace frontend\assets;

use yii\web\AssetBundle;

/**
* Main frontend application asset bundle.
*/
class AppAsset extends AssetBundle
{
public $basePath = '@webroot';
public $baseUrl = '@web';
public $css = [
'css/site.css',
];
public $js = [
'js/app.js',
'js/controllers.js',
'js/directives.js',
'js/services.js',
];
public $depends = [
'yii\web\YiiAsset',
'yii\bootstrap\BootstrapAsset',
'frontend\assets\AngularAsset'
];
}
At the same time, let's add the file
controllers.js in the same bundle. Further, we prescribe it to our frontend controller, directives.js and services.js for descriptions of the directives, and services, respectively.Will start implementing Angular in the view function of the application by adding the Directive
ng-app to the html element – it will run our AngularJS application, which we'll call app.the
...
<html lang="<?= Yii::$app->language ?>" data-ng-app="app" >
...
Please note that I wrote the Directive
data-ng-app exactly, otherwise, our html markup will not pass W3C validation. To work directives that have no effect, and the layout we must pass validation according to the specifications of the project. Therefore, for all non-standard directives we add the prefix data-.The code for the Angular app will be located in
frontend/web/js/app.js. There we will define the app and plug the modules that we are going to use.the
'use strict';

var app = angular.module('app', [
'ngAnimate',
'ui.bootstrap',
'controllers' //our module frontend/web/js/controllers.js
]);
In the file
frontend/web/js/services.js write service LeaseService, which will perform CRUD operations for your listings, by communicating with a REST API backend: the
'use strict';

var app = angular.module('app');

app.service('LeaseService', function($http) {
this.get = function() {
return $http.get('/api/leases');
};
this.post = function (data) {
return $http.post('/api/leases', data);
};
this.put = function (id, data) {
return $http.put('/api/leases/' + id, data);
};
this.delete = function (id) {
return $http.delete('/api/leases/' + id);
};
});
Today, our module
controllers will contain a very simple controller LeaseController. He will request the data from /api/leases and pass the data to the display.the
'use strict';

var controllers = angular.module('controllers', []);

controllers.controller('LeaseController', ['$scope', 'LeaseService',
function ($scope, LeaseService) {
$scope.leases = [];
LeaseService.get().then(function (data) {
if (data.status == 200)
$scope.leases = data.data;
}, function (err) {
console.log(err);
})
}
]);
Use this controller in the file
\modules\lease\views\frontend\default\index.php specifying the using Directive ng-controller and displaying the table data we received from the API:the
<div class="lease-default-index" data-ng-controller="LeaseController">
<div>
<h1>All Leases</h1>
<div data-ng-show="leases.length > 0">
<table class="table table-striped table-hover">
<thead>
<th>Year</th>
<th>Make</th>
<th>Model</th>
<th>Trim</th>
</thead>
<tbody>
<tr data-ng-repeat="lease in leases">
<td>{{lease.year}}</td>
<td>{{lease.make}}</td>
<td>{{lease.model}}</td>
<td>{{lease.trim}}</td>
</tr>
</tbody>
</table>
</div>
<div data-ng-show="leases.length == 0">
No results
</div>
</div>
</div>
Now, when we view the page at the path
/lease/default/index, we will see a list of all the listings written to the database. 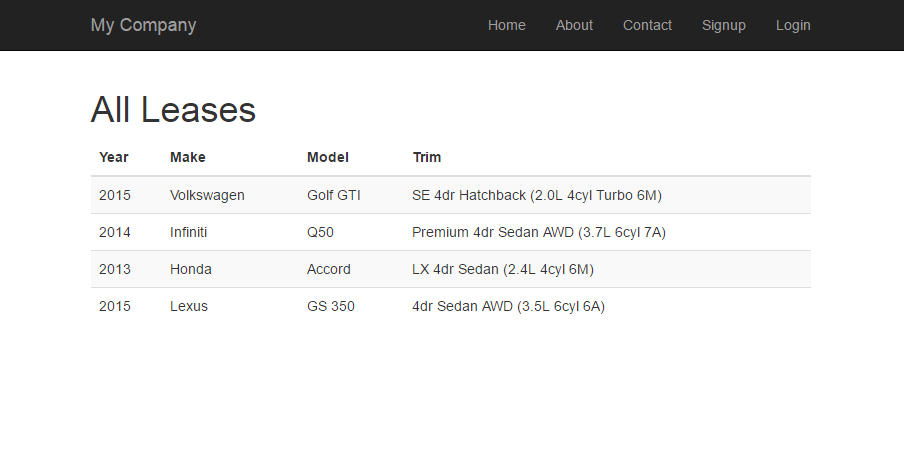
I hope you have seen how quickly and easily you can create a RESTful API interface on the basis of the framework Yii2. All described in this and previous articles code available at repository.
Material prepared by: greebn9k(Sergei Grebnyak), pavel berezhnoy(Paul gentle)

