Arduino snack machine
This post is a continuation of the story about filling vending machines simple and affordable electronics on the Arduino. And really – platform capabilities are simply endless! And so, the second machine – snack vending machine for chips/water/chocolate/etc.

The main thing – to start! The desire to buy a machine appeared after you bring to mind first the coffee machine. Many visitors wanted something to eat together with delicious coffee.
The vast network and thematic forums spent all my free time. Based on the ads for selling used snack machines, ready to save a considerable sum (about 100 thousand rubles for a simple system).
And here it is happiness – found the announcement of the sale of the machine with a simple filling (had previously sold Newspapers and magazines) for 20 thousand rubles! Word for word, has caused private traders for delivery in the city. 250 pounds of iron shipped together.
So. The first month of owning the device – known thoroughly the filling is included in the network and tested. It turns out it was formerly quite a common snack machine, only under the order of his brain was altered under the sale for 2 items on the shelf (and 2 motors on the product). Just taking and connecting additional drives – the situation has not changed – the brain was pereproshit finally, and to sell more products, he could not. Phoned the company which made the "upgrade", I learn the value of tidying – up to 10 thousand rubles only for the upgraded controller. By the way, on the Board stood the chip Atmel Mega-168, which is a bit like a good Arduino. But alas, to alter it yourself, and especially to understand the work from the periphery – would have to kill much more time.
Removing all the electronics from the machine, dragged her home. Prozvoniv and checking the operation of gears, began to draw a diagram to connect the Arduino and the periphery.
The first test Assembly was working on the Arduino Nano (freeduino), and it was able to turn the motor of the issuance by any algorithm.
A parallel was drawn layout of goods on the shelves. Scoured the Internet in search of examples, looking for snack vending machines in the shopping center of the city (photographed location and quantity of goods on the shelves), and drew a diagram for his machine. Turned standard 4 products on the first two shelves (wide packs of chips/crackers). One regiment on 8 products (bars, biscuits). And shelf for water bottle (7 products).
The engine or rather the motor with gear – is power supply 12V. On the shaft is a car that responds to a full rotation. On the shaft also engages the steel spring, the windings of which are formed product. A complete revolution of the product is shifted to the edge of the very first "Snickers" falls in the box of issue.
Having the layout of the goods, failed to understand how the motors will give out the goods. 23 motor. Was a scheme with three 74HC595 shift registers connected in series. But in the first test, but rather when you turn on the machine, registers danced as they wanted and in the end all the engines were spinning randomly for a second. Now, looking at the implementation of the scheme, I see that missed the pin control valve – when this pin outputs did not respond to the transmitted data. But that was it... just had to take the Arduino Mega, plus bipolar transistors for motor control. It turns out that involved 23 output of the Arduino to issue the goods. On the one hand it seems overkill, and with another – necessity. Perhaps in the next version I will try again the shift registers.
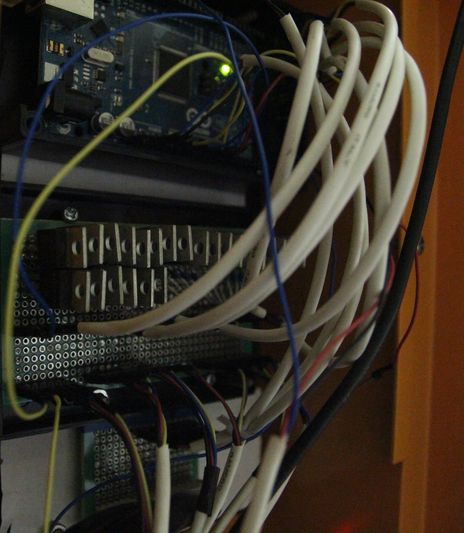
In pictures top to bottom: Arduino Mega in the plastic housing, development Board with transistors and connectors, prototyping Board with connectors for keyboard selection of items and display.
First, this task seemed the most difficult. But dismantling the keyboard, I saw that there is no controller there is no use of a conventional matrix circuit of columns and lines. Did the simple way – by 6 lines served different food (from 5V to 0.5, through resistors). And with 3 columns it reads the voltage via the analog inputs. Total, using all 3 inputs, we can read the keypad 6x3.

On the Board were set four 8-segment led displays, an led driver, which works exactly the same as the shift register. On the example of the conventional register and datasheet driver successfully wrote a function which takhirovna driver, gave the bits in order. Plus two additional LEDs which are also enabled through this register.
Imagine my surprise when this display earned! It's not just copying ready function, and start it on the controller is something else. And led display in reality looks better than LCD. During the tests ran on it the seconds counter for the night, we started just running the place. And the characters are not generated by the shift register and program register are simply shifted the bits that need to light. The program was made an array of all numbers, some letters (words Err), plus the symbol of any cash (equal sign).

On this picture we can see: the bill acceptor module of payment orders, coin acceptor with coin box, money box and a bunch of wires, which is gikavy machine, so it should be :)
In the machine already had a bill acceptor and coin acceptor with the function of the changer. They work on the MDB Protocol, which is quite difficult to implement, although the Protocol of 1993. In fact, it is a common Serial Protocol, but with some reservation – 8 data bits +the parity bit that specifies the transfer direction, and no parity. In the library SoftwareSerial in Arduino you can do logic for themselves, but surfaced another factor is the delay between command and response should not exceed 5ms, otherwise regarded as timeout. You have to communicate with the payment system in real time, and is likely to use interrupts.
Night on the Bay with the debugger com port to no avail.
But the solution was found – third party module C-MDB from our compatriots from Ukraine. The module is simply great – it works with the payment system on this Protocol and the standard com port gives the necessary data (the characteristics of the payment orders to type accept coins/bills and the status of the boxes with money).
After analyzing everything, it was decided to add basic system unit this machine on Linux CentOS. Good places are inside the machine under the shelves much as for storage of goods, and for the system unit. What functions are assigned to this computer:
the
Arduino USB via the standard output is connected to the system unit. In normal mode you will see the com port that the Arduino is writing logs and gets the answers from the demon (request prices).
Module C-MDB via a standard com-port of the system unit transmits the information about the money in the demon, which already sends only the information on the brought money into the Arduino.
Motors, keyboard and display connected to an Arduino and controlled by only her. By the way, now something like a master device is the Arduino. She makes the decision on delivery of the goods, requests the price of the computer, controls the display on and turns the engines. In the next version I want to translate all of the logic on the system unit (to the demon) and have the Arduino write-only Executive functions, as sometimes to correct begovici machine had to travel with a laptop. And fix SSH daemon in PHP is much easier.
And the web interface is just fire! Real-time visible to the sale, the balance of money in the pits, the information about the remaining goods, after the purchase, logs transactions and communications. Want to see the webcam, but it won't start I have. Suddenly who will help with the decision: ID 0c45:608f Microdia PC Camera (SN9C103 + OV7630), while trying to make the (cat /dev/video) — kernel: usb 3-2: Initialization failed again. I will retry on next open()
The daemon is written in pure PHP that monitors the com port of the module of payment orders and communicates with him, recording all the information in the log. And USB-COM port from the Arduino listens to the recording logs and responds to the request rates. Along the way, keeps records of goods sold in MySQL, and after a successful sale as well send E-mail to the personal Inbox (nice to get to see dozens of sales per day).
In the audio output card field. I wanted to record an audio zamanuhi and pristavali to people (and a quiet place in the organization). Plus connected the motion sensor to the Arduino, which responds to the passage of life. Conceived to include pristavali it is for the motion sensor, but not yet recorded phrase. Although the effect seen is simply stunning!
What I want to say – Arduino is not only a simple and cheap way to make brains an iron box, but also a great opportunity to make it your own! Yes, there were children's mistakes, when carelessness is not allowed to run the machine (for example, lost power and the engine was not strong enough to screw the Coca-Cola), but given the opportunity to undergo all these tests.
Now open the web interface, I can say that during this time there were 1355 sales. Yes, I confess – and he used to buy a coke at – albeit more expensive, but nicer :) as For the amounts – the machine was fully worth it-and invested all the time. And brings only profit and joy!
After 2 days there will arrive the installation for the sale of carbonated beverages (exactly the same as in bars, only without the taps). Setting it on top of the coffee machine by connecting the control to the brain of this machine – you will get two coupled machine with a single payment, a single management and limitless possibilities! And yet those same ideas, when the price of coffee can be reduced according to schedule (for example, from 09 to 11 am), to issue bar codes (collect 5 barcodes, and get a free any coffee), a convenient way to pour out the coffee "their" (for example, tablets ibutton or smart card), payment by SMS and much more!
And finally I would like to say that the machines are cool! Cool not only from the developer, but also user — convenient and fast! He can deceive, but do it not on purpose (the light blinked and everything was gone your credit's on the screen). Automatic round — the-clock sales and full trust him with their money and goods. He will not steal, will not cheat his master, day and night will send an E-mail about a successful sale or error, and will treat you to a free drink.
In the comments I would love to hear what features you can add to these machines.
Article based on information from habrahabr.ru
The main thing – to start! The desire to buy a machine appeared after you bring to mind first the coffee machine. Many visitors wanted something to eat together with delicious coffee.
The vast network and thematic forums spent all my free time. Based on the ads for selling used snack machines, ready to save a considerable sum (about 100 thousand rubles for a simple system).
And here it is happiness – found the announcement of the sale of the machine with a simple filling (had previously sold Newspapers and magazines) for 20 thousand rubles! Word for word, has caused private traders for delivery in the city. 250 pounds of iron shipped together.
So. The first month of owning the device – known thoroughly the filling is included in the network and tested. It turns out it was formerly quite a common snack machine, only under the order of his brain was altered under the sale for 2 items on the shelf (and 2 motors on the product). Just taking and connecting additional drives – the situation has not changed – the brain was pereproshit finally, and to sell more products, he could not. Phoned the company which made the "upgrade", I learn the value of tidying – up to 10 thousand rubles only for the upgraded controller. By the way, on the Board stood the chip Atmel Mega-168, which is a bit like a good Arduino. But alas, to alter it yourself, and especially to understand the work from the periphery – would have to kill much more time.
Do the brains of the machine yourself
Removing all the electronics from the machine, dragged her home. Prozvoniv and checking the operation of gears, began to draw a diagram to connect the Arduino and the periphery.
The first test Assembly was working on the Arduino Nano (freeduino), and it was able to turn the motor of the issuance by any algorithm.
A parallel was drawn layout of goods on the shelves. Scoured the Internet in search of examples, looking for snack vending machines in the shopping center of the city (photographed location and quantity of goods on the shelves), and drew a diagram for his machine. Turned standard 4 products on the first two shelves (wide packs of chips/crackers). One regiment on 8 products (bars, biscuits). And shelf for water bottle (7 products).
the First task is to learn how to turn on/off motors products
The engine or rather the motor with gear – is power supply 12V. On the shaft is a car that responds to a full rotation. On the shaft also engages the steel spring, the windings of which are formed product. A complete revolution of the product is shifted to the edge of the very first "Snickers" falls in the box of issue.
Having the layout of the goods, failed to understand how the motors will give out the goods. 23 motor. Was a scheme with three 74HC595 shift registers connected in series. But in the first test, but rather when you turn on the machine, registers danced as they wanted and in the end all the engines were spinning randomly for a second. Now, looking at the implementation of the scheme, I see that missed the pin control valve – when this pin outputs did not respond to the transmitted data. But that was it... just had to take the Arduino Mega, plus bipolar transistors for motor control. It turns out that involved 23 output of the Arduino to issue the goods. On the one hand it seems overkill, and with another – necessity. Perhaps in the next version I will try again the shift registers.
In pictures top to bottom: Arduino Mega in the plastic housing, development Board with transistors and connectors, prototyping Board with connectors for keyboard selection of items and display.
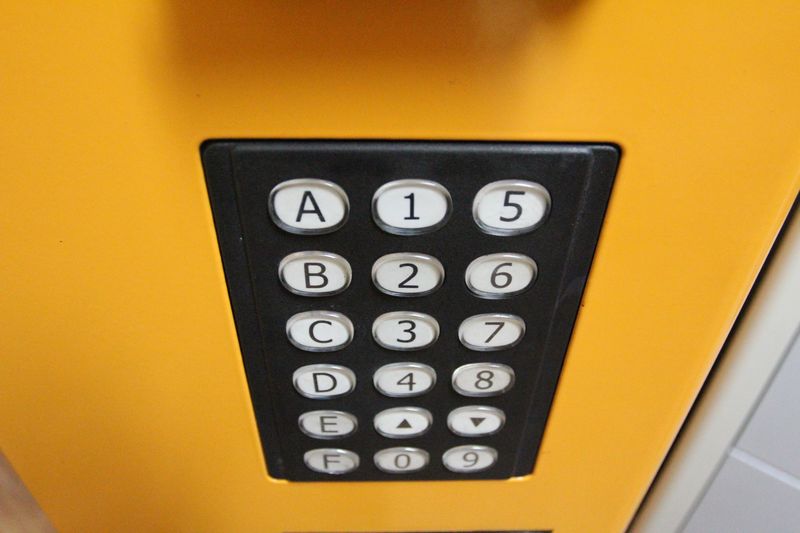
the Second task is to connect the keyboard
First, this task seemed the most difficult. But dismantling the keyboard, I saw that there is no controller there is no use of a conventional matrix circuit of columns and lines. Did the simple way – by 6 lines served different food (from 5V to 0.5, through resistors). And with 3 columns it reads the voltage via the analog inputs. Total, using all 3 inputs, we can read the keypad 6x3.
the Third task is to connect the display
On the Board were set four 8-segment led displays, an led driver, which works exactly the same as the shift register. On the example of the conventional register and datasheet driver successfully wrote a function which takhirovna driver, gave the bits in order. Plus two additional LEDs which are also enabled through this register.
Imagine my surprise when this display earned! It's not just copying ready function, and start it on the controller is something else. And led display in reality looks better than LCD. During the tests ran on it the seconds counter for the night, we started just running the place. And the characters are not generated by the shift register and program register are simply shifted the bits that need to light. The program was made an array of all numbers, some letters (words Err), plus the symbol of any cash (equal sign).
the Fourth task is the receipt of money
On this picture we can see: the bill acceptor module of payment orders, coin acceptor with coin box, money box and a bunch of wires, which is gikavy machine, so it should be :)
In the machine already had a bill acceptor and coin acceptor with the function of the changer. They work on the MDB Protocol, which is quite difficult to implement, although the Protocol of 1993. In fact, it is a common Serial Protocol, but with some reservation – 8 data bits +the parity bit that specifies the transfer direction, and no parity. In the library SoftwareSerial in Arduino you can do logic for themselves, but surfaced another factor is the delay between command and response should not exceed 5ms, otherwise regarded as timeout. You have to communicate with the payment system in real time, and is likely to use interrupts.
Night on the Bay with the debugger com port to no avail.
But the solution was found – third party module C-MDB from our compatriots from Ukraine. The module is simply great – it works with the payment system on this Protocol and the standard com port gives the necessary data (the characteristics of the payment orders to type accept coins/bills and the status of the boxes with money).
the final task is to piece it all together.
After analyzing everything, it was decided to add basic system unit this machine on Linux CentOS. Good places are inside the machine under the shelves much as for storage of goods, and for the system unit. What functions are assigned to this computer:
the
-
the
- web interface logs, inventory, money, and procurement; the
- communication with the payment module (daemon in PHP); the
- Internet access (on-site installation is wired Internet with dedicated IP address, forwarding port to the web interface and ssh is available even from your mobile phone); the
- webcam of the insides of the machine; the
- audio support, and a prompt (while in the idea as it is).
How it is connected
Arduino USB via the standard output is connected to the system unit. In normal mode you will see the com port that the Arduino is writing logs and gets the answers from the demon (request prices).
Module C-MDB via a standard com-port of the system unit transmits the information about the money in the demon, which already sends only the information on the brought money into the Arduino.
Motors, keyboard and display connected to an Arduino and controlled by only her. By the way, now something like a master device is the Arduino. She makes the decision on delivery of the goods, requests the price of the computer, controls the display on and turns the engines. In the next version I want to translate all of the logic on the system unit (to the demon) and have the Arduino write-only Executive functions, as sometimes to correct begovici machine had to travel with a laptop. And fix SSH daemon in PHP is much easier.
And the web interface is just fire! Real-time visible to the sale, the balance of money in the pits, the information about the remaining goods, after the purchase, logs transactions and communications. Want to see the webcam, but it won't start I have. Suddenly who will help with the decision: ID 0c45:608f Microdia PC Camera (SN9C103 + OV7630), while trying to make the (cat /dev/video) — kernel: usb 3-2: Initialization failed again. I will retry on next open()
The daemon is written in pure PHP that monitors the com port of the module of payment orders and communicates with him, recording all the information in the log. And USB-COM port from the Arduino listens to the recording logs and responds to the request rates. Along the way, keeps records of goods sold in MySQL, and after a successful sale as well send E-mail to the personal Inbox (nice to get to see dozens of sales per day).
In the audio output card field. I wanted to record an audio zamanuhi and pristavali to people (and a quiet place in the organization). Plus connected the motion sensor to the Arduino, which responds to the passage of life. Conceived to include pristavali it is for the motion sensor, but not yet recorded phrase. Although the effect seen is simply stunning!
One year of operation of the machine the end
What I want to say – Arduino is not only a simple and cheap way to make brains an iron box, but also a great opportunity to make it your own! Yes, there were children's mistakes, when carelessness is not allowed to run the machine (for example, lost power and the engine was not strong enough to screw the Coca-Cola), but given the opportunity to undergo all these tests.
Now open the web interface, I can say that during this time there were 1355 sales. Yes, I confess – and he used to buy a coke at – albeit more expensive, but nicer :) as For the amounts – the machine was fully worth it-and invested all the time. And brings only profit and joy!
And now the plans!
After 2 days there will arrive the installation for the sale of carbonated beverages (exactly the same as in bars, only without the taps). Setting it on top of the coffee machine by connecting the control to the brain of this machine – you will get two coupled machine with a single payment, a single management and limitless possibilities! And yet those same ideas, when the price of coffee can be reduced according to schedule (for example, from 09 to 11 am), to issue bar codes (collect 5 barcodes, and get a free any coffee), a convenient way to pour out the coffee "their" (for example, tablets ibutton or smart card), payment by SMS and much more!
And finally I would like to say that the machines are cool! Cool not only from the developer, but also user — convenient and fast! He can deceive, but do it not on purpose (the light blinked and everything was gone your credit's on the screen). Automatic round — the-clock sales and full trust him with their money and goods. He will not steal, will not cheat his master, day and night will send an E-mail about a successful sale or error, and will treat you to a free drink.
In the comments I would love to hear what features you can add to these machines.

